
TL;DR
One can create an invoice in Excel either using the template or from scratch using a blank document. You need to add details for the business, client, invoice, and the product or service offered, including quantities and rates. Use functions like Excel’s SUM function to calculate the total, then save it as a PDF to share.
Seeking the right guidelines on how to create an invoice using Excel? You have landed on the right page.
Excel is a cost-effective way to create your invoice easily without relying on a third-party tool. The program lets you create an invoice from scratch or from the built-in templates for quick generation.
Whether you are a freelancer, contractor, or handling a small business, Excel can be a true partner in everyday billing. It gives the right platform to create your own professional invoice to enhance your payment flow.
However, you must know how to create an invoice in Excel, which you’ll explore in this guide.
📌 Key Takeaways
- Excel is a widely used program for creating invoices.
- The user can create an invoice in Excel from scratch or use the template.
- An itemized list of products and services on an invoice increases transparency and enhances the viewer’s understanding.
- One must always send the invoice as a PDF created from Excel.
- Excel formulas help automate tasks and let users create accurate invoices.
Why Invoice in Excel?
There are many reasons to choose Excel for generating an invoice, which are as follows:
Cost-Effective Invoicing
Generating an invoice in Excel is quite affordable, thanks to its ready-made samples. Even so, it is cost-effective to create an invoice in Excel from scratch. There is no requirement to purchase any other expensive third-party software.
Automation
The Excel formulas let you create an accurate sales invoice. These formulas automatically calculate the amount, eliminating any room for error.
Lower Learning Curves
Excel is a quite basic and easy-to-use platform. With some understanding, creating an invoice is easy. Therefore, it is simple to create an invoice without following a complex process.
Works Offline
One of the biggest advantages of Excel is that it works offline. You can create, draft, and save an invoice completely in your system when there is no internet connection. This makes it a highly versatile platform for businesses of all sizes.
Easy Sharing
Using Excel, you can easily share an invoice in PDF or as a live spreadsheet. You can effortlessly email the invoice or save it to cloud storage.
Strange Fact
The Business Info Magazine report highlights that about 95% of the finance team still uses manual spreadsheets to manage invoices.
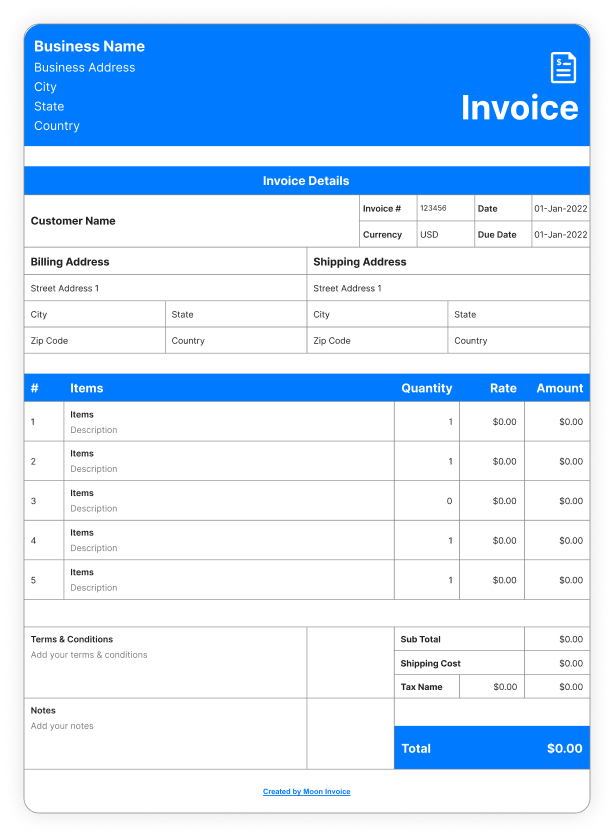
Essential Elements of a Professional Invoice
A professional invoice consists of the following elements:
Unique Invoice Number – A unique number that distinguishes one invoice from another.
Invoice Date – The date on which the invoice was released.
PO Number – The purchase order number that relates the invoice to the particular PO. This helps to track the particular purchase order for which an invoice is created.
Customer Details – Customer name, address, and contact details to whom you are generating an invoice.
Business Details/Invoice Issuer Details – The business details, such as company name, address, contact number, and email. Otherwise, the invoice issuer’s details, such as name, address, and contact information, are provided.
Line Item Details – The details of the offered services or products to the customer.
Payment Terms – Payment terms, such as net 15 or net 30, need to be included on an invoice. The other terms and conditions must also be included in the invoice.
Authorized Signature – Authorized signature of the invoice issuer or company representative.
Still Relying on Manual Invoicing?
Explore 66+ customized invoice templates of Moon Invoice and get paid faster with streamlined invoicing.
How to Make an Invoice in Excel Using a Template? Step-by-Step Guide (Windows + Mac)
Download Free Excel Invoice Template
Creating an invoice from an Excel template is straightforward. You just need to open Microsoft Excel and then edit the chosen template. Follow these steps to generate an invoice from an Excel template:
1. Open the Microsoft Excel Program
Initially, open Microsoft Excel on your PC to create an invoice using the template. It provides ready-to-use samples that you need to fill in with details.
2. Search for Invoice Template
Search for the term “invoices” in the search bar when you open the Excel. The invoice templates will be available on your screen. You must ensure a strong, stable internet connection when searching for templates.
3. Choose an Appropriate Template
From the available templates, choose the one that best matches your band. Check the design and layout to ensure the invoice looks professional.
4. Open Invoice Template
Once you have chosen the template, click on the “create” button. This will open the invoice template in a new window, allowing you to edit it.
5. Customized Template and Fill in Details
Start customizing the template and fill in the details.
- Your company logo
- Company details such as business name, address, and contact information
- Client details such as client name, address, and contact information
- Details of the offered products and services, along with their quantity and unit price
- Payment terms
- Signature
6. Save and Send Invoice
Once you have added all the information, your invoice in the Excel template is ready to be saved. Always save it as an .xlxs format document. However, when you send an invoice, it must be in PDF. You can either email the PDF or send the hard copy after printing.
How to Make an Invoice in Excel from Scratch?
You can effortlessly create an invoice in Excel manually from scratch if you don’t find an appropriate free invoice template. Here is the step-by-step guide on creating an invoice:
1. Open Blank Worksheet in Excel
To create an invoice from scratch, open Microsoft Excel and click Blank workbook. This is the first step in creating an invoice.
2. Remove the Gridlines
You need to make a clean invoice without gridlines. For this purpose, click the “Page Layout” option in the menu bar. Later on, you will find Gridlines, just uncheck the view button.
3. Add Header
Once you remove the gridlines, create and add an invoice header section, and name the title “Invoice”. Later on, add all the relevant information such as:
- Company logo
- Business name, address, and contact details
- Unique invoice number
- Invoice date
- Due date
4. Add the Client Information
Include the client’s information, such as name, address, and contact details. You must make sure that all the information is correct.
5. Describe the Offered Product and Services
Add the details of the offered product and service in an itemized format. Include the brief description, quantity, rate, tax, and discount (if applicable). If the services are based on an hourly basis, then add the hourly rate.
6. Add Total and Subtotal
Always calculate and add the total and subtotal for clarity. In Excel, this part can be automated with a sum formula, explained below:
= SUM(number1, [number2], …)
For instance, if you add the value 10 in cell C2 and 20 in cell C3, then the formula will become:
= SUM(C2:C3)
= 30
The best practice is to use the AutoSum, which automatically calculates the sum and reduces manual efforts.
7. Add Payment Terms
Mention the terms and conditions related to the billing. Highlight the key terms to capture viewers’ attention.
8. Signature
Include the digital signature in an invoice. The other way is to print the invoice and put a physical signature.
Is There Any Better Alternative Than Excel for an Invoice?
Reputable invoicing software like Moon Invoice provides a comprehensive billing solution. From creating the invoice in Excel to the final receipt of payment, the AI-powered platform has everything you need.
The platform provides 66+ customized invoice templates in Excel, Word, Docs, Sheets, and PDF. Thus, you can easily create professional invoices in Excel or any other format in less time. Using the auto-calculation concept, the templates calculate the total amount, including tax and discount. This leaves no room for error and maintains accuracy well.
Additionally, the Moon Invoice allows professionals to set up recurring invoices for the ongoing services. This keeps invoicing and your business payment flow active. You can also set up automated payment reminders to ensure on-time payment for every invoice.
This invoicing software supports 20+ payment integrations, allowing you to accept payments via your preferred method. It also supports multiple currencies and other global languages to streamline international billing.
You can easily send invoices to customers digitally via WhatsApp through the system. Also, you can send the invoice via email or as a hard copy after printing it. The software provides a centralized cloud system to safely manage all data and documents in a single location.
Overall, Moon Invoice offers a complete one-to-one invoicing solution with advanced features that MS Excel lacks.
Are Late Payments Slowing You Down?
Automate your payment reminders and boost your payment flow by 2x.
Last Word
We hope this guide on how to create an invoice in Excel is truly useful to you. Whether you are creating an invoice using a template or from scratch, it should be clear and professional. This is the key to improving cash flow and strengthening your business’s financial health, as sharing a clean invoice directly affects billing. Creating an invoice in Excel is quite easy and saves dollars. However, when it comes to a complete end-to-end invoicing solution, Moon Invoice can be your true partner. Schedule your demo now!
FAQs
What’s the best Excel invoice format?
How do I turn an Excel spreadsheet into an invoice?
Can I create my own invoice template in Excel?
How do I save an Excel invoice as a PDF?
Is it possible to automate invoicing?
We at Moon Invoice, are the best minds behind smarter invoicing and seamless business growth. We love to solve financial problems and keep providing effective tips through our blogs, newsletters, and social media channels. As a team, we continue exchanging ideas about growing financial challenges and smart use of automation tools.